T4C is a Timing Application to Organize your Meeting, Conference or Broadcast Schedule.

If your meeting has several contributions and you want to keep track of them "Timer for Conference" can help you. You plan your meeting, conference or broadcast schedule with e.g. Numbers or Excel. In the planning phase it helps to use spreadsheet features to prepare a good program for a meeting or any kind of a session with multiple contributions. T4C imports CSV files from Numbers and gives you a graphical overview of a session. When the session is running a timer for the presenter is displayed with just the information the speaker needs to stay within the scheduled time. The session coordinator gets a graphical display how talks are deviating from the planned schedule. The session coordinator selects, starts and stops the contributions. With a new auto timing mode in version 3 one can also run predetermined sessions without coordinator intervention. As a meeting leader you can concentrate on following the talks, T4C helps you to keep track of the session.

A PDF version of the manual is avaiable here.

User's Manual

Planning a meeting or a conference requires a good schedule. The schedule can be easily developed in e.g. Numbers or any other Spread Sheet program. Running the conference means to keep track of the planned program as a session chair and to give presenters a timer to stay within its scheduled talk times.

Main Panel
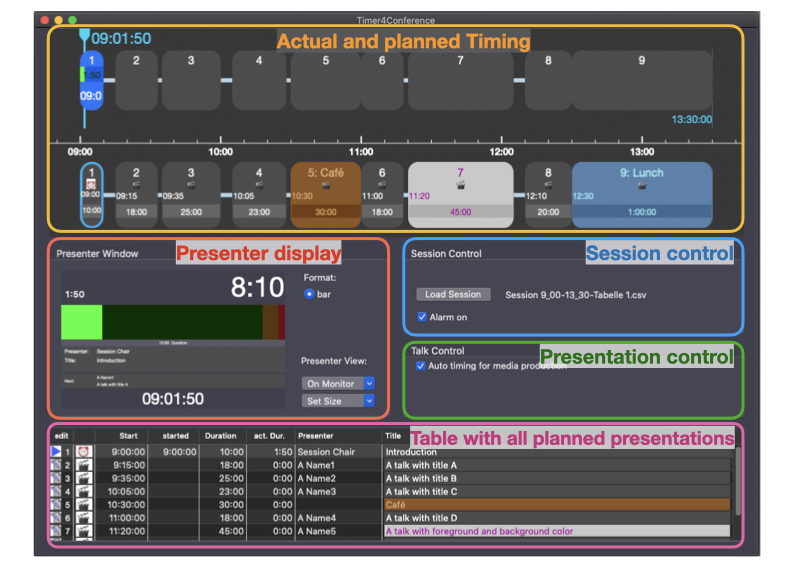
The main panel has four sub-fields:
  1. A time scale for the planned and actual session on top
  2. A copy of the presenter window (middle left)
  3. The session control (middle right)
  4. And a table with all planned talks or contributions (bottom)
Presenter Panel

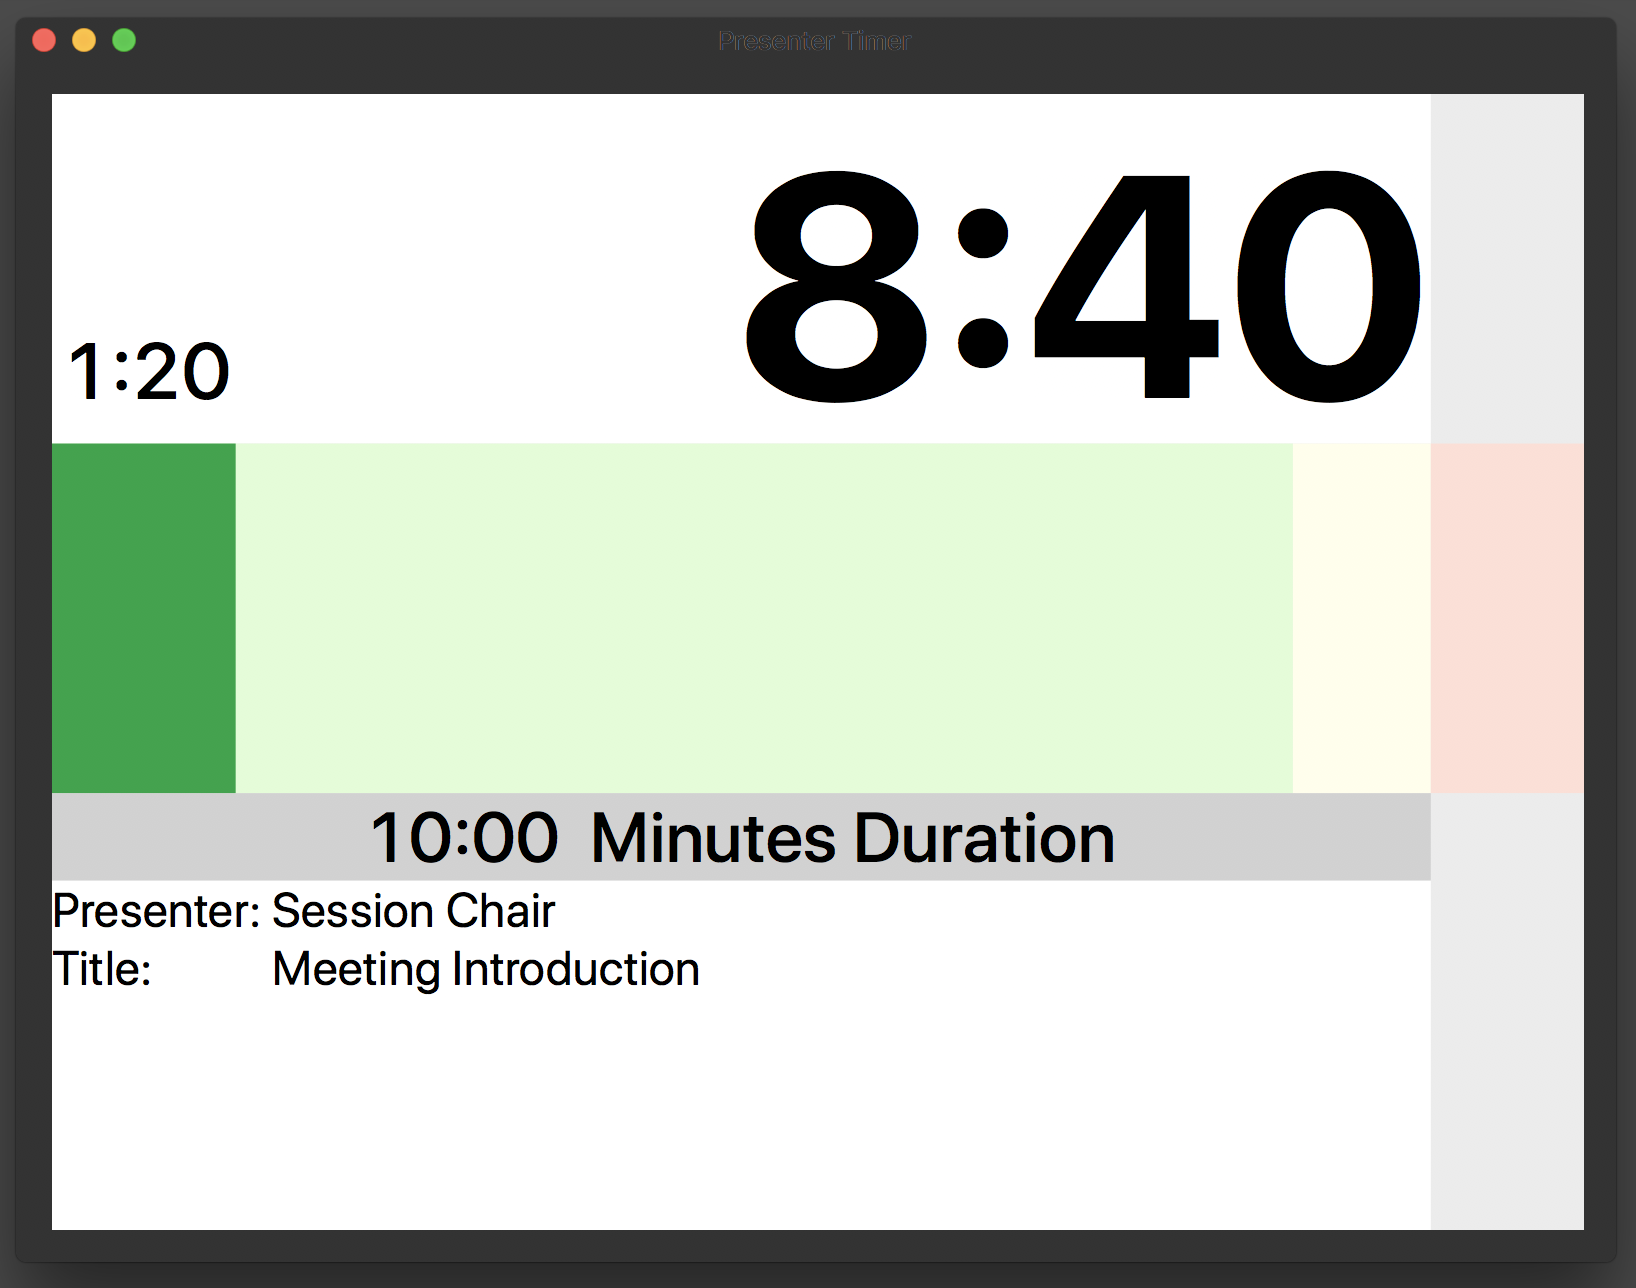
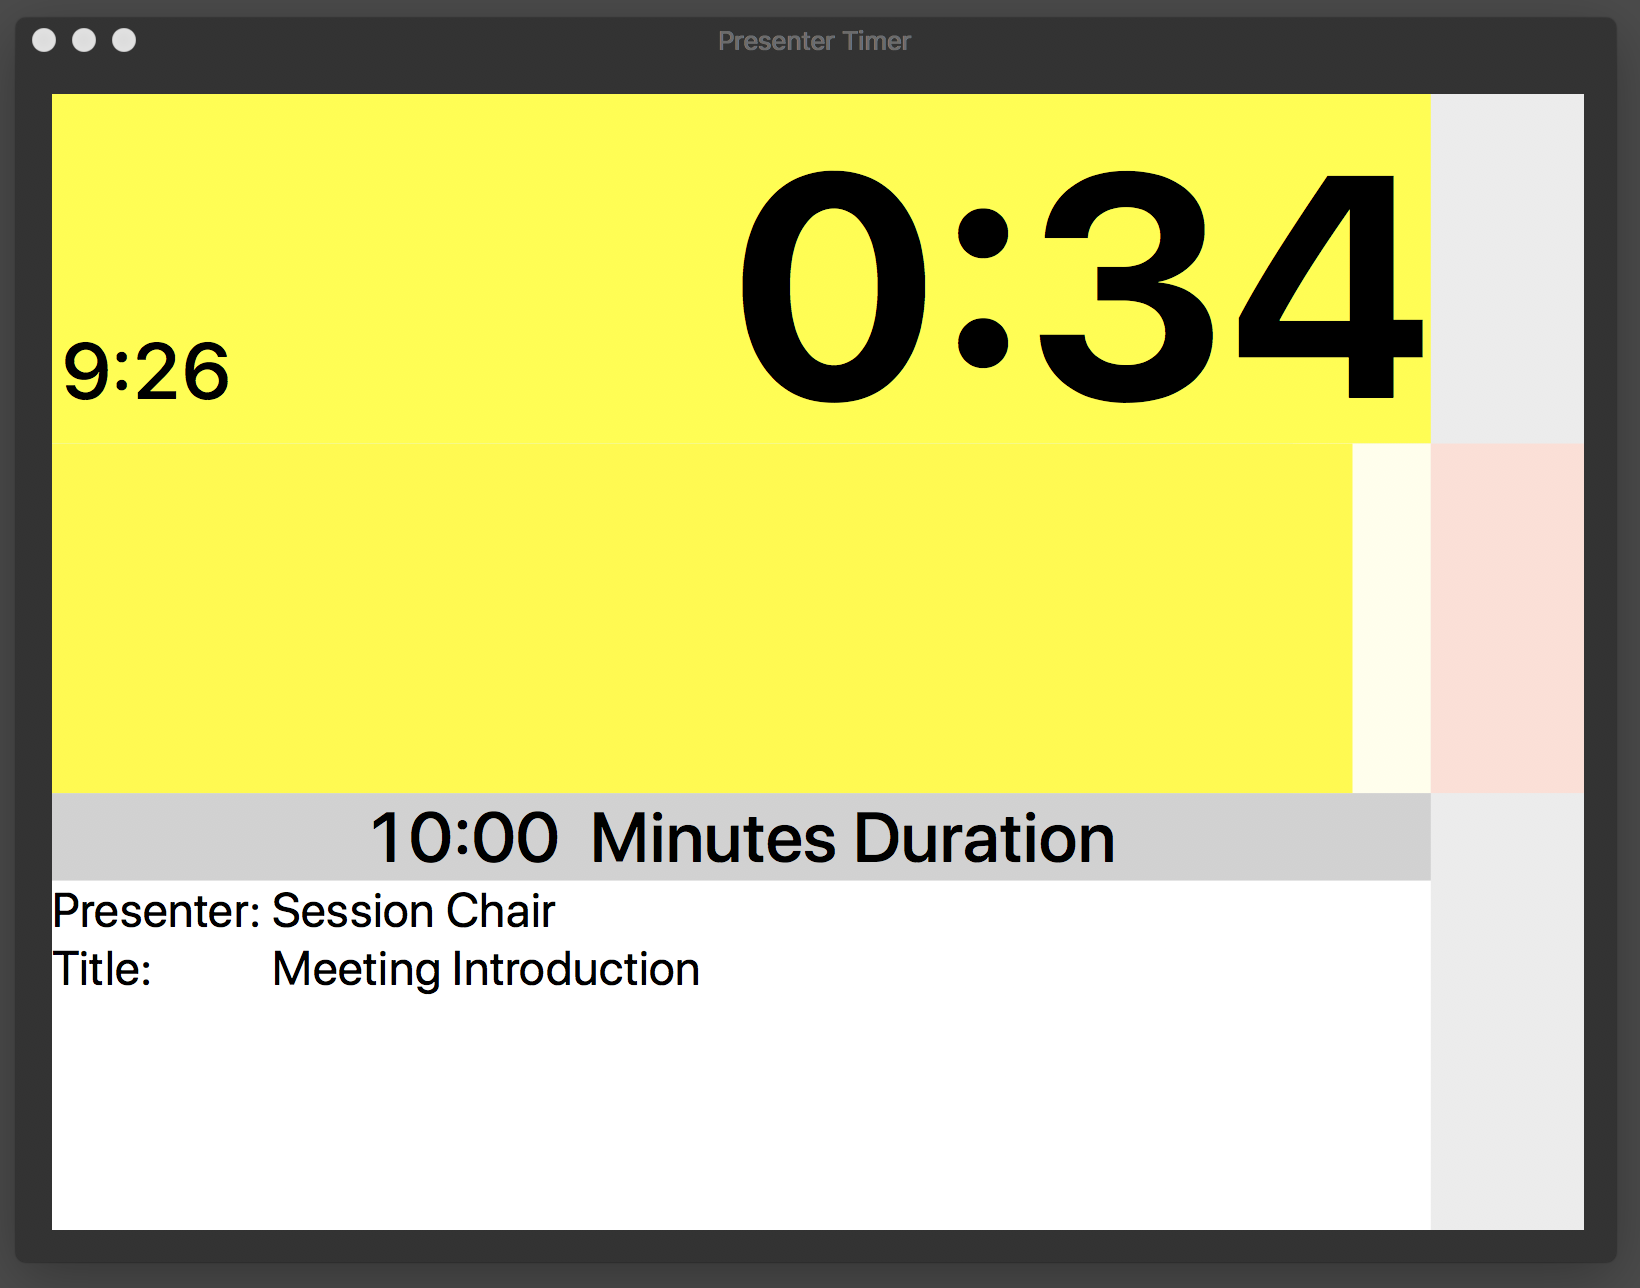
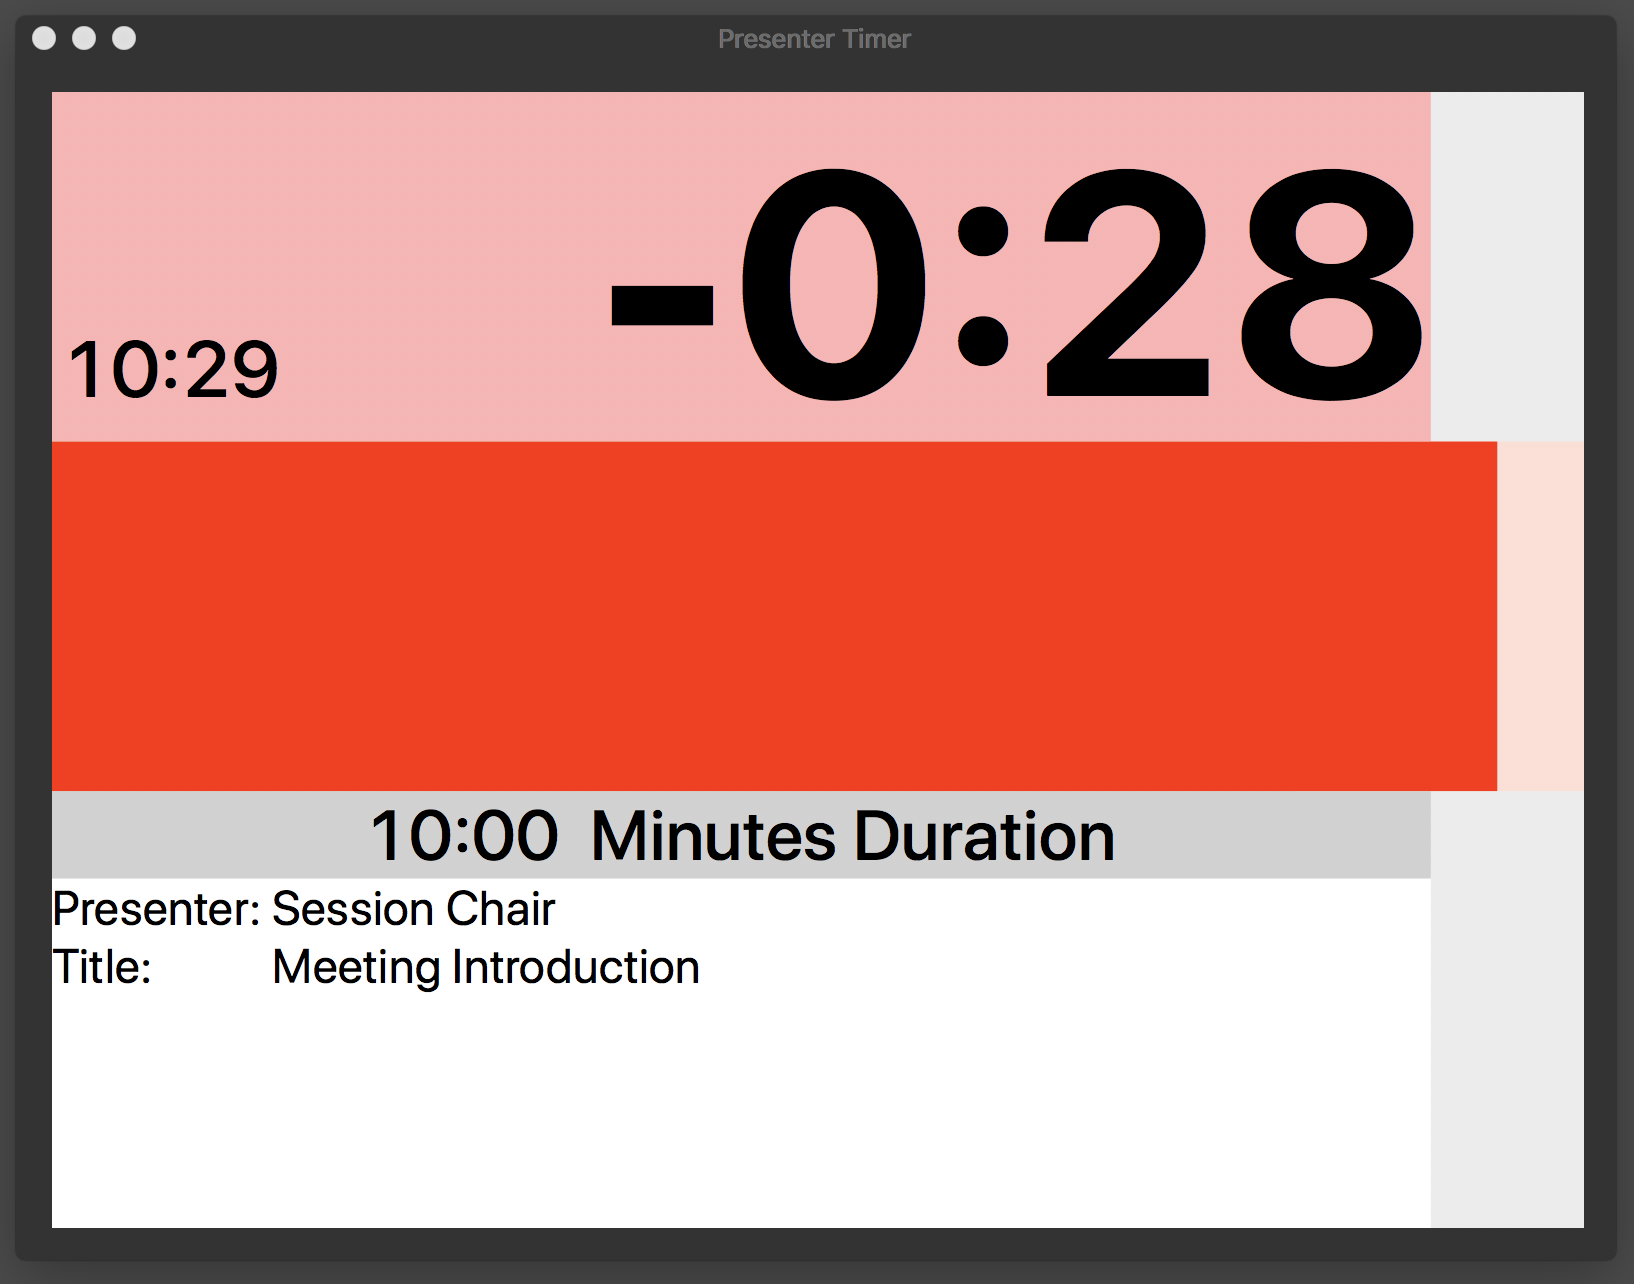
A second panel can be connected to the computer as a display for the presenter. It just shows the relevant information for the speaker: The total time he has, and the remaining time he can talk.

The following picture shows the three states of a talk:
  • Green: indicates the first 90% of the talk.
  • Yellow: 10% left for the talk.
  • Red: overrun of the talk.
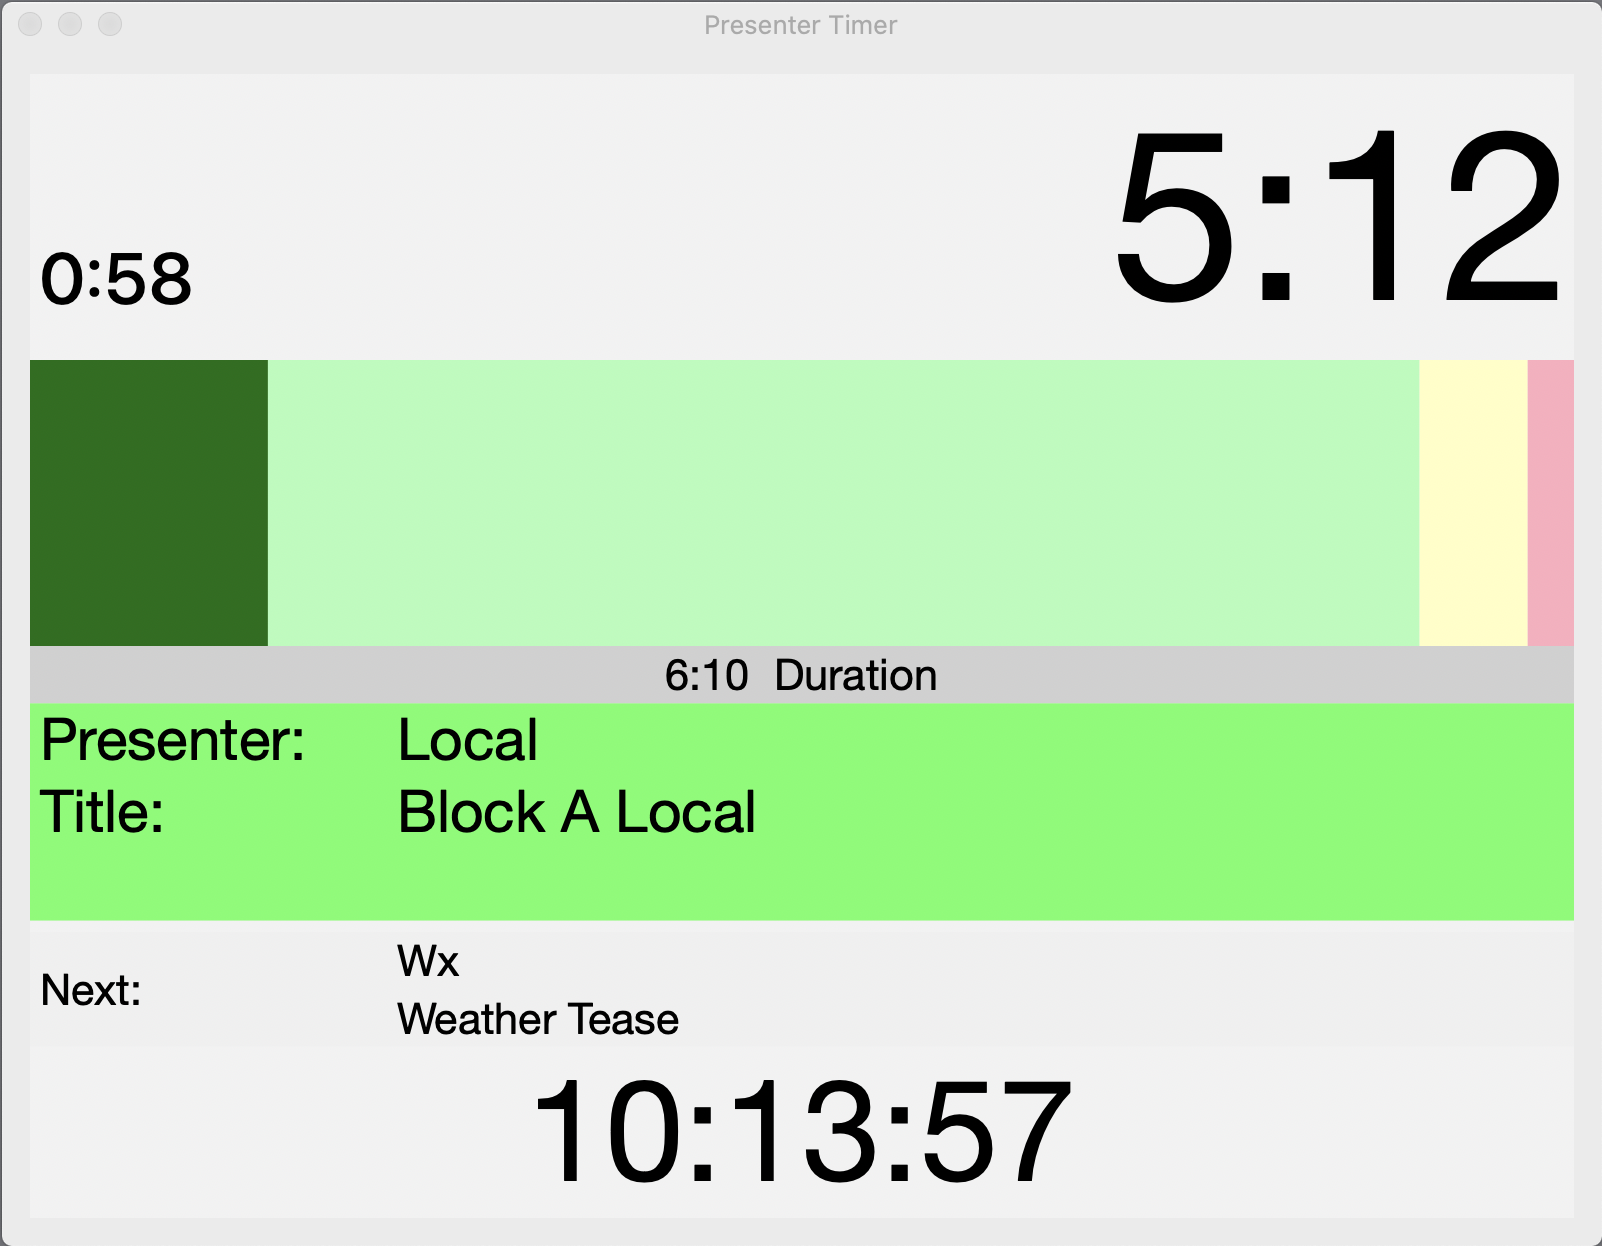
Presenter panel in auto timing mode. Beside the active contributions it shows in addition the next talk and the time of day.
Main Elements of the Manager Panel

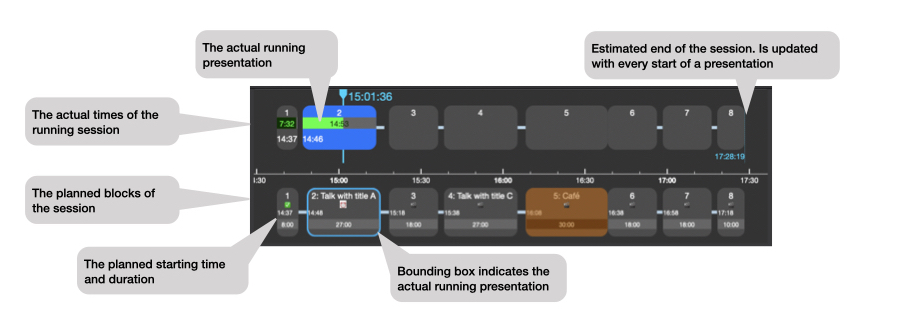
The actual and planned timing: Shows in a graphic the planned and actual presentation blocks. The currently running talk has a black outline. The finished talks are marked with color if they were in-time or overrun.

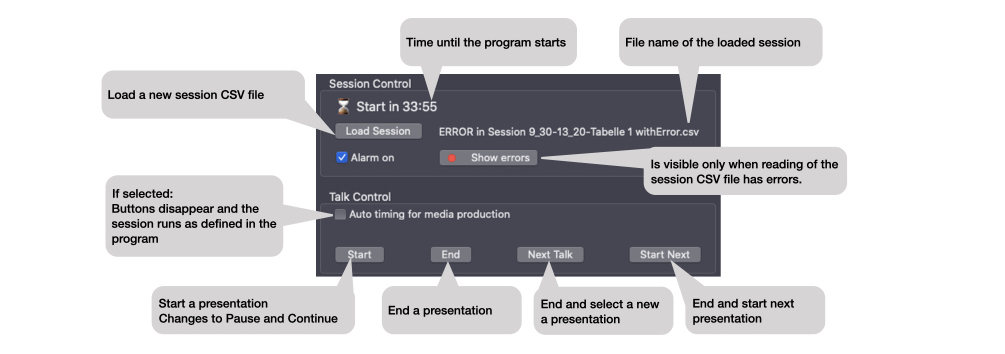
The session control: Contains a button to load a session file (CSV format). If read errors are detected in a file a further button appears to view the error messages. The presentation or talk control: The part of the panel is used start and stop the presentation timer and to select the next talk. When the “Auto timing for media production” is selected all buttons are hidden since no further control is required. This mode is used when the defined program does not allow deviations e.g. for a broadcast production.

The presenter control: Shows a copy of the presenter display. It allow to select the format of the presenter display, the size and the monitor to display it.

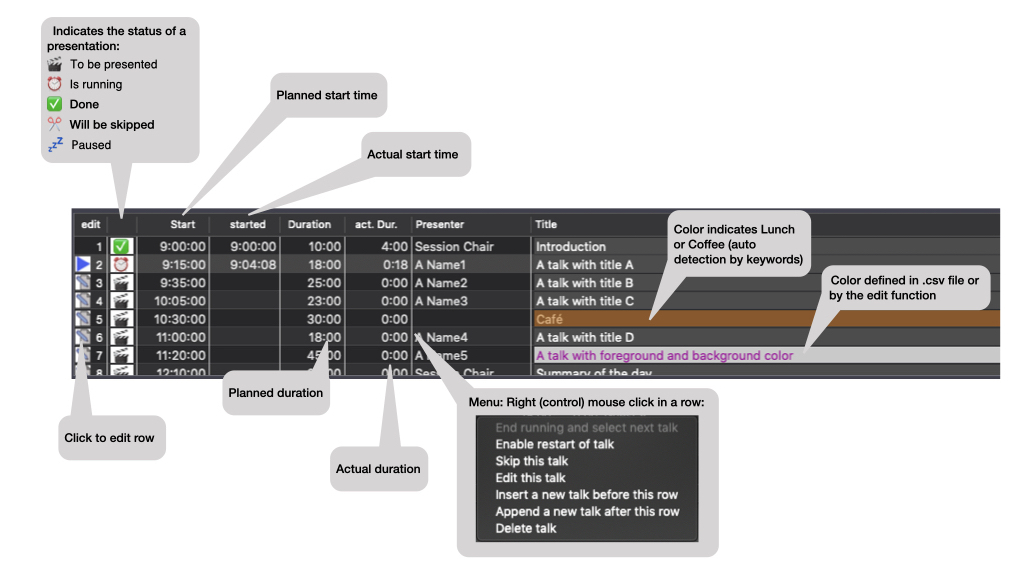
The table with all planned presentations: In the table shows all talks read fro the session CSV file. In addition to the planned times it will be updated with actual values of start times and durations. These values can be exported (File menu -> Save As…).

How to Drive a Session
The steps to start and run a session are:
  1. Load a session file, click on “Load Session”:The format of a session file must be CSV as generated by e.g. Numbers. The details of the format is described further down.
  2. The blocks of the session are shown in the table and as graphical representation.
  3. Press “Start” to activate the counter of the first talk.
  4. Press “Pause” when the talk is interrupted and the time should not be subtracted from the speakers time. The button changes to “Continue”.
  5. Press “End” when the talk is finished.
  6. Press “Next Talk” to load the timing info of the next presentation or select the next talk by clicking on a row in the table.
  7. Continue with “3.”.
To run a session in “Auto timing” mode:
  1. Load a session file with “Load Session” button.
  2. Select “”: buttons are hidden and the presenter window shows a count down of minutes and seconds until the planned program starts and runs through all contributions without user interaction.
How to Prepare a Session File
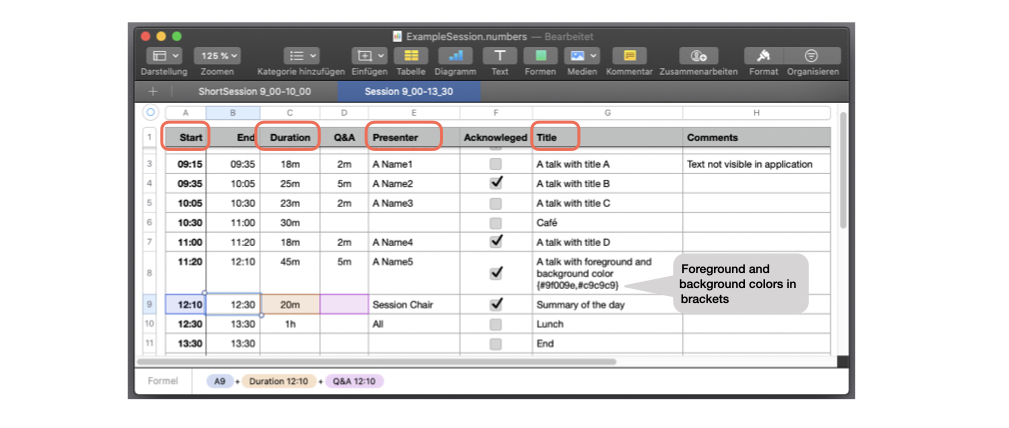
A session can be prepared with the help of Numbers. A few rules have to be followed to allow “Conference Timer” to interpret the data.:
  1. The first line (the header) must contain the column names.
  2. The column with the name “Start” is used to calculate the start time of a block (a row in the table).
  3. The “Duration” column is used to calculate the nominal time of a block. When the presenter exceeds this time the panel indicates red.
  4. “Presenter” is shown under author in the panels. This column might also be named “Author” or “Speaker”.
  5. The column “Title” is used to fill the corresponding fields in the application.
  6. The “End” column is optional. All other columns are ignored.
  7. The “Q&A” column in the example is used to add time for questions and answers. A formula (as shown in the picture) can be used to calculate the next start time by numbers. The application is not using this “Q&A” column.
  8. The “Title” column may contain a foreground and background color of a talk to highlight special contributions. The format starts with a “{“ followed by a “#” and a 6 character hex code with the foreground color followed by a “,” and the background color “#123456” and ends with “}”. The hex number is composed by 2 digits for each red, green and blue in the range 0 to ff (standard Web color code). #000000 is black, #ffffff is white, #0000ff is blue.
  9. Newlines are allowed in the “Title” fields (hit control & return together on the keyboard).
  10. Avoid merging of cells since it changes the column order. All rows must have the same number of columns.
  11. If reading of the file detects errors a click of the appearing button “Show errors” brings up a panel with the error messages.

A Numbers file may have several sheets to e.g. group sessions. A CSV export command creates a file per sheets. The name of a sheet is shown on the main panel next to the “Load Session” button.

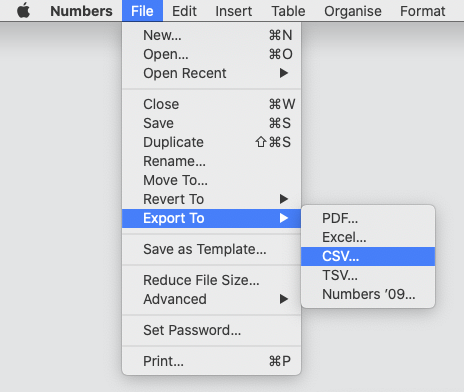
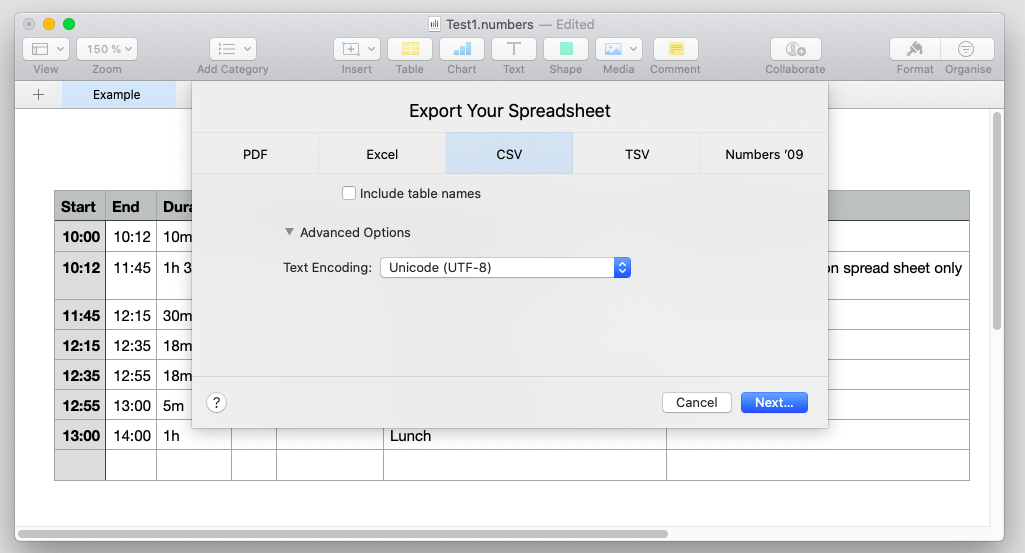
To create a CSV file go to “File” menu of Numbers and “Export To” as “CSV…”. In the appearing panel select “UTF-8” as text encoding (default). With “Next…” a file in the local directory with .csv ending should be chosen. “Timer for Conference” can import this file.

The created CSV file can be further edited with a simple text editor. It is also possible to just create a CSV file without Numbers. The format is shown in the following foldable block:

unloaded
How to Modify or Edit a Session

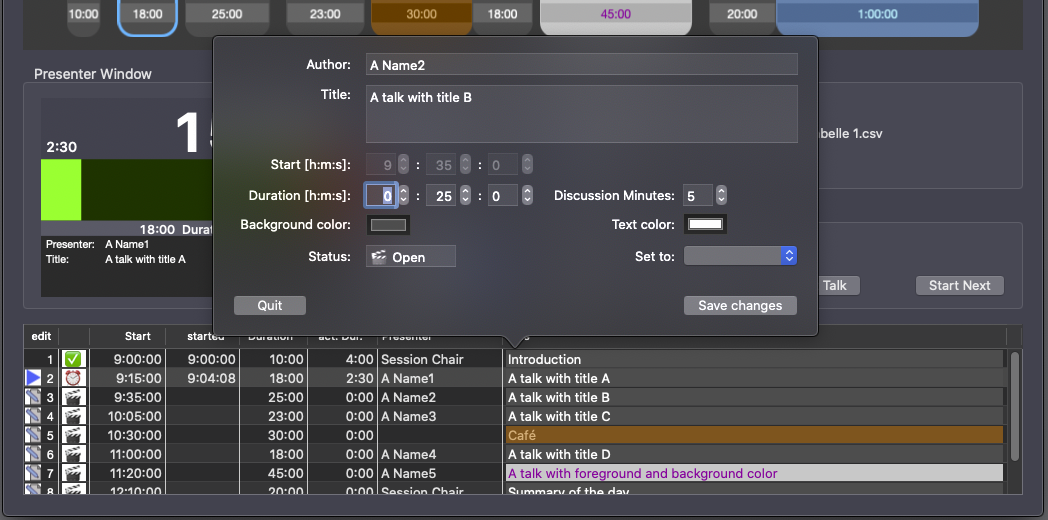
A session can be modified or new items can be added or items can be deleted. To edit existing rows a click on the left most edit column in a row opens the edit window. All items can be modified except the start time after the session was started. If the session was not started it is possible to set the start time of the session in the first row and all following start times are recalculated from the durations and discussion settings. To add a new talk before or after a row use the context menu (right click on that specific row). After a modification the “Save changes” button must be pressed.

Help Menu

The menu “Help” has two entries. “Timer for Conference Help” will display this help text in Preview. “Numbers with Demo” opens Numbers (if installed) with a small demo file. This file can be used as a template to create own session plans.

File Menu

The “File” menu allows to read session files and to save a session. A saved session file includes the actual start time and the used time for each talk. This output is in CSV format and can be imported in e.g. Numbers. The “Print” allows printing a screen shot of the main panel in PNG format.

Timer Display for the Presenter

Besides the person that guides through the session the presenter has to know how much time he or she has during a talk. A separate screen with the basic information a speaker needs can be shown with the “Show on Monitor” pop-down menu. The menu shows all available screens connected to the computer with its position relative to the main screen, the screen sizes, and the screen names. If a new monitor is connected to the computer it will be visible in the “Show on Monitor” menu after a restart of the program or by selecting “Rescan Monitors” in the “View” menu. The “Set Size” pop-down can select a default size of the presenter window or it can scale to the full screen size of the monitor it displays. If the main window runs full screen and the other monitor[s] are black, system preferences should be changed. In System Preferences” go to “Mission Control” and select “Displays have multiple Spaces”. Logout is required. An iPad might be used as external display. Programs like “Yam” (https://www.yamdisplay.com) or Sidecar on newer macOS (https://support.apple.com/en-us/HT210380#systemrequirements) allow connecting your Mac via a WiFi network as a speaker timer. A cable-less connection is quite handy since it allows a flexible positioning of the speaker timer screen. Further wireless helpers are offered in the Apple App Store.